*Disclaimer* I assume no responsibility for you or your vehicle. If you can’t install an after-market radio, you shouldn’t be doing this on your own.
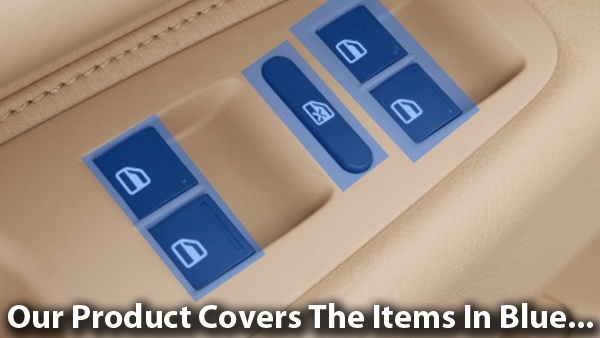
Today, I’m repairing the worn-off buttons in my climate control, using the product discussed in this thread here:
http://www.clubtouareg.com/forums/f45/possible-solution-for-peeling-buttons-80957.html
I’m removing the radio & the control panel, as I’m adding an iPod adapter at the same time. This can be done with the unit in the vehicle, but it will be more difficult..
Here’s the center stack. You’ll notice my white fan button. This is what is getting fixed.
![Image]()
You’ll need radio removal tools, which can be had here:
42nd Draft Designs 42-002 EnfigCarStereo.com
Here’s mine (comfort-grip electrical tape installed):
![Image]()
Radio on its way out:
![Image]()
![Image]()
Out:
![Image]()
Remove the switches, and you’re left with a hole:
![Image]()
I removed the four screws for the radio cage & removed it as well:
![Image]()
You’ll need something to push the clips holding the climate control panel in. I’ve had this for years & it always comes in handy:
![Image]()
Close-up of the clip that needs to be depressed:
![Image]()
Unclip the wiring harness connectors (may vary depending on the spec of your vehicle, mine had three) & slide the panel out:
![Image]()
You’re left with an even bigger hole:
![Image]()
At this point, you should use the included sandpaper, clean off whatever buttons you are replacing, & apply the “stickers” via the included instructions. The soft-touch on my climate control unit was all peeling, so I took this opportunity to disassemble it, and scrub it off. Example of what I’m talking about:
![Image]()
Since the buttons are the only thing that are white, the soft-touch can be safely scrubbed off of the remainder of the unit with a combination of things, including, but not limited to; a brown scotch-bright pad (doesn’t scratch), a plastic card (local grocery store rewards card, etc.) & a razor blade for the tight spots (WILL SCRATCH, CAREFUL!). The following is a series of pictures of the unit being taken apart & Taking it apart:
![Image]()
![Image]()
![Image]()
![Image]()
![Image]()
Scrubbed & going back together:
![Image]()
![Image]()
![Image]()
I cleaned off both button, since they were the only ones I couldn’t take out:
![Image]()
The stickers:
![Image]()
Step 1 (I used a razor blade to take them from the paper to the unit, being careful not to touch the sticky side). They have cut-outs for the symbols, so be careful not to catch or otherwise fold the sticker:
![Image]()
Step 2 (same thing, just make sure its lined up on the edges properly):
![Image]()
Other side:
![Image]()
Reinstalled (I used a hair dryer to warm them, then press them firmly into place):
![Image]()
![Image]()
Today, I’m repairing the worn-off buttons in my climate control, using the product discussed in this thread here:
http://www.clubtouareg.com/forums/f45/possible-solution-for-peeling-buttons-80957.html
I’m removing the radio & the control panel, as I’m adding an iPod adapter at the same time. This can be done with the unit in the vehicle, but it will be more difficult..
Here’s the center stack. You’ll notice my white fan button. This is what is getting fixed.

You’ll need radio removal tools, which can be had here:
42nd Draft Designs 42-002 EnfigCarStereo.com
Here’s mine (comfort-grip electrical tape installed):

Radio on its way out:


Out:

Remove the switches, and you’re left with a hole:

I removed the four screws for the radio cage & removed it as well:

You’ll need something to push the clips holding the climate control panel in. I’ve had this for years & it always comes in handy:

Close-up of the clip that needs to be depressed:

Unclip the wiring harness connectors (may vary depending on the spec of your vehicle, mine had three) & slide the panel out:

You’re left with an even bigger hole:

At this point, you should use the included sandpaper, clean off whatever buttons you are replacing, & apply the “stickers” via the included instructions. The soft-touch on my climate control unit was all peeling, so I took this opportunity to disassemble it, and scrub it off. Example of what I’m talking about:

Since the buttons are the only thing that are white, the soft-touch can be safely scrubbed off of the remainder of the unit with a combination of things, including, but not limited to; a brown scotch-bright pad (doesn’t scratch), a plastic card (local grocery store rewards card, etc.) & a razor blade for the tight spots (WILL SCRATCH, CAREFUL!). The following is a series of pictures of the unit being taken apart & Taking it apart:


Scrubbed & going back together:


I cleaned off both button, since they were the only ones I couldn’t take out:

The stickers:

Step 1 (I used a razor blade to take them from the paper to the unit, being careful not to touch the sticky side). They have cut-outs for the symbols, so be careful not to catch or otherwise fold the sticker:

Step 2 (same thing, just make sure its lined up on the edges properly):

Other side:

Reinstalled (I used a hair dryer to warm them, then press them firmly into place):


")