Club Touareg Forum banner

My Audio Upgrade: '12 TDI Sport Nav.

116K views 176 replies 41 participants last post by  Philth  
#1 ·
Day 1: Rear Doors: Audison Voce.


I was pleasantly surprised when I went to use my new triple square bits (as indicated in some threads that this was the bit set that was required) only to find that the door panels are held on by Torx screws.

The touareg is a decently quiet vehicle to begin with, but I always add a bit of deadener to strengthen the mid bass response. The doors inner plastic panel requires some as it is a bit thin and very flexible around the speaker mount. When I looked within the door panels, the upper had an odd very thick deadener already applied, the middle had a butyl rubber/silver foil, like dynamat, and the bottom behind the speaker has none.

I was toying with surface mounting the tweets but that would require cutting into the surrounding plastic around the tweeter grill. One mistake would cost hundreds of dollars to fix. I opted to mount the tweeters behind the door grill when I easily discover that I could screw/bolt them to the door panel and hide the screw heads behind the tweeter grill.

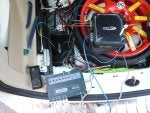
First round of pics.
 

Attachments

This post has been deleted
#6 ·
Xylene, this is brilliant, thank you. Can you provide some specifics on the Audison speaker model you purchased? Full name and size would be appreciated.

Thanks.

The Voce set I am using in the back is the AV K6. Audison Voce - AV K6


The tweeters can be purchased separately and are the AV1.1. In the front stage I am mixing hertz high energy 165xl drivers with the Audison AV 1.1 tweeters. (Hertz and Audison are sister companies under the company of electromedia)


I will warn you that the crossovers are too big to fit in the available space in the back door, (which is next too the woofer toward the rear hatch), I had to remove the cover and side plastic casing. I am not worried about having any issues with them as they are on the inside of the door and have plenty of space between it and the door panel. If you are using the set in the front doors, there is plenty of room for the crossovers.
 
#9 · (Edited)
Front Door

I had a chance to tackle the front doors. The process is almost the same with the exception of a couple of more bolts and lack of ashtray LED.

I used the same technique to mount the tweeter. I did have to expand the available hole and trim a little more off the mounting bracket.

I wanted to make sure the crossover had a enough air space around it and decided to mount it onto the inner door panel. I cut the sound barrier and made a simple wiring harness incase the door had to be dismantled in the future.

I also used a better deadener, second skin instead of dynamat ex., due to the impact that the Hertz drivers will have when they receive the proper power…


Image

Image

Image

Image

Image

Image

Image

Image

Image
 
#10 ·
Front Drivers Door

Drivers side front door...

Since all the doors are now complete, the extra deadener makes the ride super quiet.

The stock amp has ample power to get the speakers going. At half volume is when the speakers start to wake up and the clarity of the mix is prevalent. I do find it annoying the system only has bass and treble adjustments and no midrange.

On the back doors I set the crossovers tweeters at 0db and set the fronts to -2db.

Next up will be one or more amps. I am debating if I really want the sub as I purposely picked the Hertz 165xl because of their lower frequency range.


Image


Image


Image


Image
 
#11 ·
This is really useful for me, xylene! Thanks for your ongoing efforts.
I am really curious about the use of factory amp with this. I really don't want to disrupt my new Treg any more than necessary. If this indeed improves the fidelity just by adding the upgraded speakers, I am seriously going to consider imitating what you have done to date.

I'm all eyes and ears as you proceed!
 
#15 ·
This is really useful for me, xylene! Thanks for your ongoing efforts.
I am really curious about the use of factory amp with this. I really don't want to disrupt my new Treg any more than necessary. If this indeed improves the fidelity just by adding the upgraded speakers, I am seriously going to consider imitating what you have done to date.

I'm all eyes and ears as you proceed!
Well the upgrade is a yes and no scenario. Fidelity is greatly improved but the flaws of the system are also greatly accentuated. The factory amp clips (degrades in clarity) at around 2/3 of max. volume. At lower volumes, the head unit processing needs help. The clarity of better speakers makes this more evident. At half volume it cleans up and sounds very nice but any more power the amp is at its limit. I will be adding an amp to bring the speakers to its fullest potential.
 
#13 ·
Yes it is... On a Touareg :). Thank you.

The Touareg is a bit easier than other vehicles to work on. The door clips are the best (just remember to reset). It will not break if it is stuck to the door and releases from its holder without cracking the door plastic.

I've only had the Touareg for 3 months and have been cautious with proceeding with my build. There is very little detail/experience with this generation. And those that have posted pictures haven’t touched the door speakers and/or had someone else do the work.


Attachments

#17 ·
Just an update

After a few weeks I am done torturing my hearing. The stock systems equalization to make up for the inadequate speakers has to be annihilated.

I am adding an Audison bit10 processor to correct the stocks equalization and the interior environment.

Because I do not have the camera setup I do not have the stock equipment rack in the rear wheel well next to the factory amp. I am debating if I want to build a rack for my two amps and bit10 or install everything to the left of the spare. I would rather have accessibility to the amps and wiring because I play around building subs.

I am starting with my custom down firing dual 8" sub and might end up building a custom fiberglass enclosure. I deadened the spare area to help support the sub and block exhaust heat in case I add my amps in that location.
 

Attachments

#18 ·
I would have a lot of trouble wrapping my head around the concept of not having any spare tire at all (or are you still going to be able to fit the compact spare?).

I have talked to an installer about fabricating a custom sub box to fit the driver side cubbyhole in the back cargo area. The guy seemed to think that was very doable and would sound good. The factory door speakers are definitely mediocre at best, no argument there. The head unit might sound ok with some aux amp assistance. I just need to pull the trigger...
 
#19 ·
I would have a lot of trouble wrapping my head around the concept of not having any spare tire at all (or are you still going to be able to fit the compact spare?).
The spare still fits. The picture is to show the amps I am using and their size. I didn’t take a picture of the two amps stacked where the 4 channel amp is located.

The other picture with the red circle indicates a nice location to put the processor. I would just need to trim the foam a little. I already added some deadener.
 
#20 ·
I am very interested in how this sounds once you add the sound processor. Are all the connections located in the back? Are there adapters to hook this up or will you need to splice factory wiring? Did you have to splice any wiring for the front doors.

I'm very interested in improving the sound staging and clarity of my stock system. GREAT WORK!
 
#21 ·
I am very interested in how this sounds once you add the sound processor. Are all the connections located in the back? Are there adapters to hook this up or will you need to splice factory wiring? Did you have to splice any wiring for the front doors.

I'm very interested in improving the sound staging and clarity of my stock system. GREAT WORK!
The sound has improved immensely since the addition of the bit 10.

The only splicing I had to do to the factory system was with the door speaker wiring. I used various harnesses to tap into the factory amp and to feed the door speakers.

Tomorrow I should be able to get around to posting the rest of the install pics.
 
#22 ·
More pics...

The last part of my install saga... I ran a direct 12V+ line from the battery to the cargo area for the two amps and audsion bit ten. The battery box and lid needs a little cutting to accommodate the lead. I used a factory ground location for my amps and bit 10.

I built my own wiring harnesses using 16 gauge speaker wire. All connections were soldered and coated with liquid electrical tape.

For both the ground and 12V+ connections, I ran a single wire and then spliced short leads. These were crimped, soldered, liquid taped and then wrapped with electrical tape. I have no unnecessary electrical noise in my system. :clapclap:

I added some deadener to the back hatch to support the sub.

I built the amp tower in this manner for cooling and decreased vibration.

Do not waste your money and time trying to use one of those Parrot harnesses for this system. I took the advice from a couple of members, (you know who you are :hug:), and the links they provided yielded a worthless harness that does not match the sale picture.

Use the following Metra harnesses to make you life easier... To tap into the factory amp: 71-9003 (You remove the part as seen in the picture)... To connect an amp into the factory speaker wiring: 70-9003... Both can be purchased for 1/4 the price of the incorrect parrot knockoff.
 

Attachments

#23 ·
Wow, I'm so unfamiliar with my touareg that I don't know what I'm looking at in half these pics. So the only cable you had to run to the back was the power cable, correct? So the battery is under the front seat or is it the back seat? Where did you mount the subs?

How does it sound with the amps? How does the sound compare to stock? How about compared to say an '06? Do you see any evidence of mods? How much would you charge to come out to Washington State to do this to mine? LOL!! I've installed several systems in older American cars but nothing ever as nice or advanced as a 3rd gen Touareg. I might leave this to a shop......
 
#24 ·
Wow, I'm so unfamiliar with my touareg that I don't know what I'm looking at in half these pics. So the only cable you had to run to the back was the power cable, correct? (Yes)...So the battery is under the front seat (Yes and you have to remove the driver seat completely, 4 triple square head bolts, to get to the battery) or is it the back seat? Where did you mount the subs? (The sub is a box that I made and had sitting around. It consists of two 8" subs in a sealed 28.5" x 10" x 6.5" box. Currently I have the subs facing the hatch on the passenger side in the cargo area.)
How does it sound with the amps? (What? I can’t hear you, LOL) How does the sound compare to stock? (Don’t remind me of that nightmare. My new system is in a much different league. It's a sound quality system. It is super clean and detailed.)
How about compared to say an '06? (I don't know as this is my first Touareg), Do you see any evidence of mods? How much would you charge to come out to Washington State to do this to mine? LOL!! I've installed several systems in older American cars but nothing ever as nice or advanced as a 3rd gen Touareg. I might leave this to a shop...... (The only scary part is that you are tearing into a much more expensive vehicle. The install is just as simplistic as anything else. It’s actually more convenient. There is no dash to rip apart, no firewall to run the power threw, the factory amp is in the back and there is lots of room to work with, and the kicker is there is already a grounding bolt clean of paint waiting for you.
Here are a couple of other threads that may help you.

http://www.clubtouareg.com/forums/f45/2011-touareg-sound-system-poor-sound-quality-55552.html

and

http://www.clubtouareg.com/forums/f45/touarics-2012-tdi-lux-audio-build-thread-76397.html
 
#26 ·
The sub setup is pictured. When I get around to it I will post a picture where I have it in the cargo area.

"I added some deadener to the back hatch to support the sub." …. Without going into detail on how mass loaded deadeners work, in a nut shell this means by adding the deadener the sub is more effective and the listening environment is less effected by outside road noise.
 
This post has been deleted
#28 ·
Has anybody compared a 2012 stereo with the 2010 Dynaudio system? Does the Dynaudio system have better speakers? I see that Xylene said there is no mid range adjustment on his stereo, but I have it on my Dynaudio system.

Just wondering how good a system/speakers this Dvnaudio rig is in my Touareg? It sounds pretty good to me, but I am coming from a 2004 Audi/Bose system. Just wondering if an upgrade is worth it?
 
#52 ·
Has anybody compared a 2012 stereo with the 2010 Dynaudio system? Does the Dynaudio system have better speakers? I see that Xylene said there is no mid range adjustment on his stereo, but I have it on my Dynaudio system.

Just wondering how good a system/speakers this Dvnaudio rig is in my Touareg? It sounds pretty good to me, but I am coming from a 2004 Audi/Bose system. Just wondering if an upgrade is worth it?
i have the Dynaudio - no where near as good as the Hertz equipment being installed here.

much nicer than Bose....
 
#29 ·
OK - I am definitely one of the people who thought that the Parrot harness was the way to go. My bad... I apologize. I know have both the Parrot harness, and the two metro harness xylene references here. I want to do my install tomorrow - I have been sitting on all the stuff for about 6 months.

I have a key question: How did you make the harnesses work? Both of them seem to be missing the main power and ground (those 4 round holes in the pics) for the amp unit. I don't understand how to make them work without a way to get the power and ground connectors into them. Can you help me?

I also have a TDI, so I have no amp rack, so I am going to try to install the processor and the amp in the spare tire area. If I can solve my understanding of the harnesses, I should be able to get the install don't tomorrow.

Thanks in advance.
 
#32 ·
I have a key question: How did you make the harnesses work? Both of them seem to be missing the main power and ground (those 4 round holes in the pics) for the amp unit. I don't understand how to make them work without a way to get the power and ground connectors into them. Can you help me?

I also have a TDI, so I have no amp rack, so I am going to try to install the processor and the amp in the spare tire area. If I can solve my understanding of the harnesses, I should be able to get the install don't tomorrow.

Thanks in advance.
In my setup, the amps and audsion bit 10 receive the power directly from the battery. The bit 10 is autosensing and the amps are signaled to turn on via a remote turn on/signal wire from the bit 10.

When the bit 10 gets signal power from the factory speaker outputs it powers up. The bit ten via the remote turn on wire, then signals the amp to turn on.

You can power and ground a Line Out Convertor (LOC), like a bit ten, directly to the wiring that powers the factory amp. You would have to splice the factory wires.

I prefer not to splice existing factory power wires and grounds. The main reason is warranty. The practical reason is I do not want any unnecessary ground loops.

The reason why I do not have an amp rack in my TDI is due to not having the factory backup camera.

If you have the metra harnesses, you will not use the part that has the round holes.

On this harness you lift the little tap on top and on the bottom right and you remove the piece that you see. This is used to replace the one in the factory connector at the back of the amp.
This step gives you the factory speaker output from the factory amp to use with your line out convertor.

Image


You then use the other metra harness (with the male metal spades) to feed your new amps output into the existing factory speaker wiring. (The orange thing is the connector that use to reside in the factory connector at the back of the amp, which is replaced by the part from the other metra harness, previous picture…
Image
 
#30 ·
Jdsmooth,

I am gearing up to have this done, but haven't yet. Just from my reading, power needs to be tapped separately. Many have run dedicated power from the battery. I have wondered why not run the amp power from the same switched power supplying the head unit?

The head unit resides in the passenger side rear wheel well with a few rack spaces. The HU can be moved to a different rack space to open up its space which seems to fit a few different amps.

Can someone tell me why the HU power shouldn't or can't be tapped?

I am trying to do a clean and easily reversible install with no new wire runs...
 
#33 ·
Jdsmooth,

I am gearing up to have this done, but haven't yet. Just from my reading, power needs to be tapped separately. Many have run dedicated power from the battery. I have wondered why not run the amp power from the same switched power supplying the head unit?

99.99% of aftermarket amps require a lot more power than the stock power lead to the factory amp. That circuit’s fuse would instantly blow.

You could power and ground your LOC to the factory amps wiring… but why take the risk in terms of warranty protection.

The head unit resides in the passenger side rear wheel well with a few rack spaces. The HU can be moved to a different rack space to open up its space which seems to fit a few different amps.

If you do not have the factory back up camera, you will not have the rack.


Can someone tell me why the HU power shouldn't or can't be tapped? I already did.

I am trying to do a clean and easily reversible install with no new wire runs...
If you are looking to add an amp, you have to run a direct line from the battery. If you had had to pull the system fast, you would take the $15 hit and leave the 12V+ lead. Just pull the main fuse on the power lead and tape up the end.
 
#35 ·
x2 on the thank you. That was an excellent explanation and is appreciated. I got my install completed today in about 4 hours. I used the metra harnesses exactly as described and ran the factory amp signal to the processor, then used RCA cables to get the signal to a small Rockford Amp, and then fed the newly amplified signal back to the factory speaker wires. The 32 terminations was the most time consuming part of the install.

I also added an amplified JL Audio Subwoofer fed from the 3rd channel out of the processor.

The only area I ran into trouble with was the battery access. I got the seat unbolted and out of the way, but I could not figure out how to get to the battery itself. I ended up tying my power lead into the bus bar that runs our of the battery tray and over to all of the fusable links on the outboard side of the battery. It seems to work with no issues. I fed that power cable to the rear cargo area where I ran it into a 4-way distribution block and then out to the two amps and the processor. The processor has level sensing remote on/off, and a remote out that I fed to the other two amps.

The amp and the processor are tucked into the well in front of the spare tire well. I removed one block of foam to get a really nice area for mounting equipment.

Not a bad way to spend a labor day!
 
#36 ·
Xylene
Thanks for that patient and detailed explanation... Really nice! How essential was the Audison bit ten to getting the sound that you wanted? Did you end up making significant adjustments to phases or delay to get the stage right?
I did not have to make any significant changes with the bit 10. That does not mean that you would have the same result. It really depends on your setup... speakers: quality, the number of, location, addition of a sub, extra deadening, amp used, setting up the amp gains....

The sub is the only thing set out of phase. I was expecting that due to the front drivers low end reach.

Most of my tweaking was setting the gains on the amps and passive crossovers that come with the speakers. I changed the front passive crossovers tweeters eq’s to 0db from the initial -2db after the addition of the amps.

I have the time alignment set to the center above the Nav screen. There are very little eq adjustments on all channels. In the front the frequencies in the 2khz range are boosted by +.3 to +.5. The rear stage is cut at that range and I set a band pass eq to dull the upper range to keep the sound stage from being pulled back.

No matter where you sit the imaging is perfect.