Club Touareg Forum banner
21 - 39 of 39 Posts
The power supply I linked does voltage and current control, Ive used them to control current for driving LEDs, charging batteries...

Are the factory level sensors simply a resistance pot? (not LVDT/Hall effect)
Oops my bad, sorry looked at it too quickly :wink2:

Not sure, i'll have to read the SSP on them
 
I believe you guys are thinking about a much more automated systems than what I'm considering...... I basically just want to be able to supply some current to the struts to "unlock" them from the fail safe of 0A....... maybe not full soft, so let's assume 1A would be some "normal" dampening. The "bags" would be on the same air line and not independent, as I'd want them inflated at the same pressures to equally eliminate the squat caused by the trailer. No automation desired.... a simple pressure regulator or equivalent to allow inflation\deflation....... I'm not looking for on-the-fly tuning or fancy automated self leveling stuff.... my current steel suspension doesn't have any of that either LOL

Am I overlooking something here? Are there pressure solenoids or other such things integrated into the strut assemblies?
Haha yes I think your right. And yes you could simply hook up air fittings to them and pump them up to raise your load. Similar to the old muscle cars that had air shocks in the back.

And yes you could simply apply a certain current to both to achieve the desired ride that you want.
 
I wouldn't have left and right air bags connected to a common line (all the time). My Range Rover would cross connect air bags when detecting a lot of articulation (off road mode). This has a similar effect as disconnecting a sway bar. If left and right airbags were always sharing a common line, I think the car would have a lot of body roll.

I think a mechanical bare bones system will require a lot of constant tweaking to maintain proper (level) ride height. Parking on driveways, Parking on the side of a crowned road, temperature changes, minor leaks, uneven weight distribution, emergency maneuvers... I think to handle all the variations in the real world, some automatic function would be highly desirable. A low level switch to add air, and high level switch to bleed air out, and a deadband in-between wouldn't be very complicated to implement. I'd add a button to enable leveling so it's not constantly making adjustments as you drive.


I believe you guys are thinking about a much more automated systems than what I'm considering...... I basically just want to be able to supply some current to the struts to "unlock" them from the fail safe of 0A....... maybe not full soft, so let's assume 1A would be some "normal" dampening. The "bags" would be on the same air line and not independent, as I'd want them inflated at the same pressures to equally eliminate the squat caused by the trailer. No automation desired.... a simple pressure regulator or equivalent to allow inflation\deflation....... I'm not looking for on-the-fly tuning or fancy automated self leveling stuff.... my current steel suspension doesn't have any of that either LOL

Am I overlooking something here? Are there pressure solenoids or other such things integrated into the strut assemblies?
 
Are the factory level sensors simply a resistance pot? (not LVDT/Hall effect)
They are more complex than a resistance pot, they actually use 3-phase AC with a rotor and coil.

 
Discussion starter · #25 ·
Some valid concerns being brought up..... I have to ponder a little more on my attempted "zip tie" approach here..... some things have been said that I had not considered prior to this discussion.....
 
They are more complex than a resistance pot, they actually use 3-phase AC with a rotor and coil.
I did some researching, here's a level sensor with built in signal conditioning that gives a linear analog output. Land Rover Discovery II 1999-up This would be much easier to connect to a PLC. This is what I'd use if just trying to implement rear leveling.

The air compressor unit looks well suited for controlling just the rear suspension too. It has built in dryer, and inflate deflate solenoids to control Left and Right side airbags.
 

Attachments

Discussion starter · #28 ·
lot of fake parts on Ebay this seller screams China rip off but selling this part as being in Germany. look at the other parts they sell and countries they sell from
The listing was used for "visual" purposes....
It's hard to describe "air spring" accurately when most of us on this side of the pond haven't ever seen them. :grin2:
We are used to air bags over here which are a way different animal.
 
Hi Chewblekka,
do you have pics of how the level sensors are mounted on the rear? I'd like to find a level sensor that closely matches the mounting, but has an analog 0-5v output

I ended up buying a Cayenne 958 rear air shock assembly on eBay for $200. I also got a Cayenne solenoid bank and some hard line to start testing with my PLC. If I get one wheel working the way I want, I'll buy the Cayenne compressor, tank and the other air shock. I'm planning to run the hard line either under the car, or have it pop up through the shock tower and keep the valve block in the trunk. Im trying to avoid pulling the interior apart, and also want it easily removable when I sell the car.
 
Here's how the rear sensors are mounted:


And here's the wiring for the valve block (NX7) and connector:


The valve block is supplied with 12v on pin 5, and receives a ground to shift each valve.
 
Here's how the rear sensors are mounted:

And here's the wiring for the valve block (NX7) and connector:
Thanks, that's a big help. Pretty neat that the solenoid block also includes a built in pressure sensor. I assume this the pressure signal that tells the ECU to shut off the compressor?

There are 5 solenoids, 4 for each corner, and the 5th one selects inflate (accumulator) or deflate?
 

Attachments

Thanks, that's a big help. Pretty neat that the solenoid block also includes a built in pressure sensor. I assume this the pressure signal that tells the ECU to shut off the compressor?

There are 5 solenoids, 4 for each corner, and the 5th one selects inflate (accumulator) or deflate?
There's 6 solenoids on the valve block. 4 for the airbags, one for the drain line, and one for the pressure input. The pressure sensor measures pressure in each air line.

The accumulator has it's own solenoid (N311). You can see it in the wiring diagram I posted, it has the 3 wires going to it. The other part of that valve N179 switches compressor output to either the valve block or accumulator.

The airflow is this:

Compressor output to the 2-way valve (N179 and N311). From there the valve either connects the compressor to the accumulator to charge it, or to the valve block to directly feed the bags. The accumulator can fill or store air from the bags by opening N311 and closing N179. Now the valve block supply is connected to the accumulator, and the compressor is "disconnected" from the system.

The T3/4 air system is different from the T1/2 system in that it is closed versus open. In the T1/2 system, when lowering, the bags would drain to the atmosphere and the compressor would always replenish the reservoir. This is inefficient, requires more use of the compressor, leads to slower raise time, and allows moisture into the system. The T3/4 closed system has the accumulator charged with Nitrogen to 250psi (much higher than the compressors max output of 120psi). Under normal circumstances, the bags fill from the reservoir, then drain back to the reservoir when lowered. This system raises MUCH faster compared to the older system. It also keeps the system moisture free, which helps with longevity. The compressor is basically for a failure/emergency situation. The T3/4 system also has load sill lowering, which is activated by a switch in the trunk. It allows you to lower the rear axle an additional ~2" to aid in loading the trunk.

The one thing I dislike about the newer system is that it eliminated the tire filler line under the passenger seat. I much prefer that to using the electric air compressor.
 
How do the bags exhaust into the reservoir if it is at 250 psi?

The valve bank I'm looking at NX7 has only 5 solenoids.

Sounds like I can eliminate the accumulator from my design, and have the compressor directly inflate the bags. I'll program the PLC to only allow the compressor to run if a bag inflate valve is open. Im only looking to maintain one height since the fronts are non-adjustable coils, so no need for speedy changes. I'll look into installing an inline dryer.

Also looks like I might be able to use the stock Cayenne ride height sensors. Looks like they are 3 wire devices.


There's 6 solenoids on the valve block. 4 for the airbags, one for the drain line, and one for the pressure input. The pressure sensor measures pressure in each air line.

The accumulator has it's own solenoid (N311). You can see it in the wiring diagram I posted, it has the 3 wires going to it. The other part of that valve N179 switches compressor output to either the valve block or accumulator.

The airflow is this:

Compressor output to the 2-way valve (N179 and N311). From there the valve either connects the compressor to the accumulator to charge it, or to the valve block to directly feed the bags. The accumulator can fill or store air from the bags by opening N311 and closing N179. Now the valve block supply is connected to the accumulator, and the compressor is "disconnected" from the system.

The T3/4 air system is different from the T1/2 system in that it is closed versus open. In the T1/2 system, when lowering, the bags would drain to the atmosphere and the compressor would always replenish the reservoir. This is inefficient, requires more use of the compressor, leads to slower raise time, and allows moisture into the system. The T3/4 closed system has the accumulator charged with Nitrogen to 250psi (much higher than the compressors max output of 120psi). Under normal circumstances, the bags fill from the reservoir, then drain back to the reservoir when lowered. This system raises MUCH faster compared to the older system. It also keeps the system moisture free, which helps with longevity. The compressor is basically for a failure/emergency situation. The T3/4 system also has load sill lowering, which is activated by a switch in the trunk. It allows you to lower the rear axle an additional ~2" to aid in loading the trunk.

The one thing I dislike about the newer system is that it eliminated the tire filler line under the passenger seat. I much prefer that to using the electric air compressor.
 

Attachments

You charge the accumulator with the car at load level. It will drain the accumulator to raise it.
 
I pulled the drivers side rear level sensor out, hooked it up to 5v & an o-scope, but can't seem to figure out how to get a signal out of it. I'm probably going to go with a different sensor anyways, since the mounting position is already occupied on the drivers side. Hoping to find a cheaper version of this: https://www.omega.com/en-us/sensors-and-sensing-equipment/displacement/displacement-sensors/linear-variable-inductive-transducers/ldi-119/p/LDI-119-050-A010A?gclid=Cj0KCQjw2IrmBRCJARIsAJZDdxB1n0U_vMEKqDVqVluncuSmhMcPVaiN_7T0ekroyRZMhOemGcUUytgaAomsEALw_wcB Also have the Land Rover sensors on order (2 for $35).

Also wondering if I could just get by with pressure control on each bag. Have a preset pressure for normal driving, and a preset pressure for when towing a trailer. Some of the aftermarket air suspension controllers rely on pressure control, doesn't quite make sense to me, but I guess I can experiment.
 
I spent a few hours getting a PLC program written and simulated.

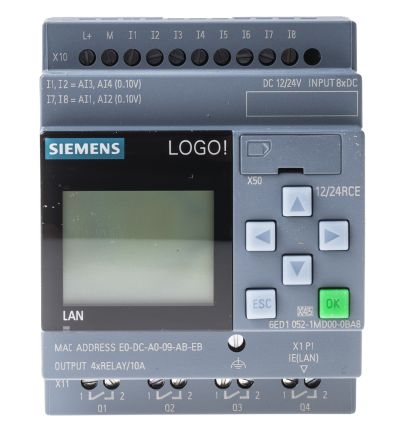
I'm using a Siemens Logo PLC with keypad and LCD on the front ($140). Also has web server and ethernet, so things could be displayed on a tablet/phone. A panel mount LCD is also available.
Image


First screen shows status of automatic mode. "Vent", "Pump", "Left bag", "Right bag" solenoid status. Actual ride height, set point, and +/- deviation before inflating/venting for Left and Right bags. Example, setpoint is set to 500, if actual drops below 300 the bag will inflate until 500. If actual is above 700, bag will deflate until 500. These variables can all be changed from the keypad.

Second screen shows alarm messages (ride height out of range, compressor running > 5 mins, venting more than 90 sec.) Alarms stop auto mode until faults are cleared.

Six more screens allow for manually jogging the left, right, or both air bags; up/down.

Eager for parts to arrive and start testing.
 

Attachments

There's 6 solenoids on the valve block. 4 for the airbags, one for the drain line, and one for the pressure input. The pressure sensor measures pressure in each air line.

The accumulator has it's own solenoid (N311). You can see it in the wiring diagram I posted, it has the 3 wires going to it. The other part of that valve N179 switches compressor output to either the valve block or accumulator.

The airflow is this:

Compressor output to the 2-way valve (N179 and N311). From there the valve either connects the compressor to the accumulator to charge it, or to the valve block to directly feed the bags. The accumulator can fill or store air from the bags by opening N311 and closing N179. Now the valve block supply is connected to the accumulator, and the compressor is "disconnected" from the system.

The T3/4 air system is different from the T1/2 system in that it is closed versus open. In the T1/2 system, when lowering, the bags would drain to the atmosphere and the compressor would always replenish the reservoir. This is inefficient, requires more use of the compressor, leads to slower raise time, and allows moisture into the system. The T3/4 closed system has the accumulator charged with Nitrogen to 250psi (much higher than the compressors max output of 120psi). Under normal circumstances, the bags fill from the reservoir, then drain back to the reservoir when lowered. This system raises MUCH faster compared to the older system. It also keeps the system moisture free, which helps with longevity. The compressor is basically for a failure/emergency situation. The T3/4 system also has load sill lowering, which is activated by a switch in the trunk. It allows you to lower the rear axle an additional ~2" to aid in loading the trunk.

The one thing I dislike about the newer system is that it eliminated the tire filler line under the passenger seat. I much prefer that to using the electric air compressor.

Hi Chewblekka, great info in that post. Thanks. I have a question. Is there a common denominator in the elec system where the air compressor and the brake vacuum pump are connected ? I have a recent fault where the Red 'Stop Fault Running Gear' code comes up and neither the compressor or vacuum pump are operating. Front struts are now deflated (after a weeks). I've put 12v to each of the pumps individually and they operate well and all fuses and relays (side of dash, under seat and engine bay fuse box's) are in good order. hmmmm.
 
Hi Chewblekka, great info in that post. Thanks. I have a question. Is there a common denominator in the elec system where the air compressor and the brake vacuum pump are connected ? I have a recent fault where the Red 'Stop Fault Running Gear' code comes up and neither the compressor or vacuum pump are operating. Front struts are now deflated (after a weeks). I've put 12v to each of the pumps individually and they operate well and all fuses and relays (side of dash, under seat and engine bay fuse box's) are in good order. hmmmm.
Suspension and brakes are two independent, non-connected systems. You need to scan your car and see what comes up.
 
If you only want to control the rear sag when towing I would suggest just using a Weight Distributing Hitch as it gives a lot of other benefits as well and cheaper than going the rear suspension bit.
I use a Reese Mini 350 because I have a small trailer with a low tongue weight.
Of course the Anti WDH group would advise against it even thought the hitch has the WDH ratings right on it.
 
21 - 39 of 39 Posts