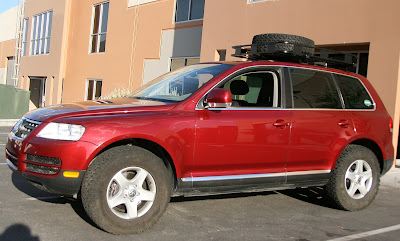
I decided to acquire and install a 45" wide by 50" long Surco Safari Rack for my offroad Touareg in preparation for Colorado Rally. With family coming along for the ride, I needed to recover trunk room for additional baggage that would be coming along on the trip. In addition, having the space would be nice for many other trips, daily groceries, and when I load up the rig for communications events.
The listed configuration for a Surco Safari rack is 45" x 60" long. This should fit; however it would shadow the entire sunroof when installed. Since I wanted the sunroof for light, and the capability for a copilot to crawl through for 'hatch' viewing, I decided the 45" x 50" version was appropriate.
There are other options - Yakima and Thule make excellent roof baskets. However to go this route often means investing in their rack system or an adapter before the basket is acquired. And in most cases their roof basket s are about 40" wide. I desired more room to clear several Ham antennas mounted on the roof channel; as well opportunity to store 48" sections of mast, shovels, and other items along side the mounted tire.
The Surco Safari Rack can be acquired for around $260 with proper legs; with the Spare Tire Carrier an additional $80 using online shops.
The Surco Safari Rack arrived. Las Vegas neighbor and frequent Touareg offroader Vegas Matt generously offered to help, so we met at his garage / facility to install the system.
![Image]()
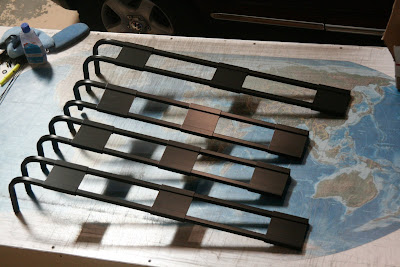
Construction starts with 4 "L"-shaped basket sides.
Connect each side to form the loop. Sheet metal screws
are used to secure the sides together.
![Image]()
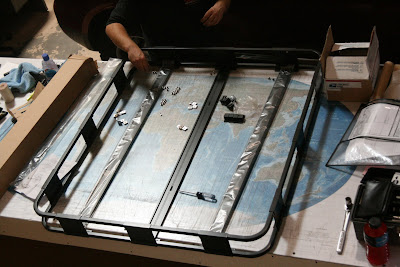
Three slats are added to form the 'floor' of the basket.
![Image]()
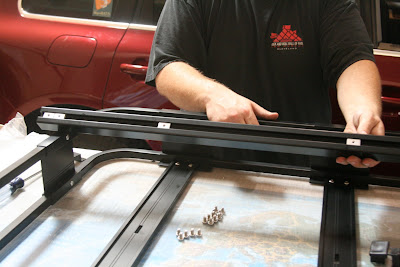
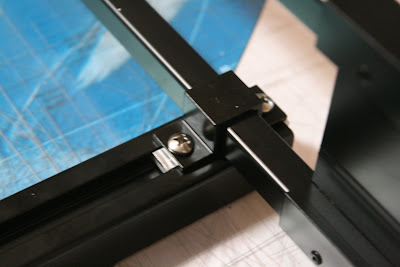
Two crossbeams are added. Threaded metal squares are slid into the channels to secure the side and each floor slat to the crossbeam.
![Image]()
A bracket is added to secure the crossbeam to the side. Note how the screw is bolted into the threaded metal square.
![Image]()
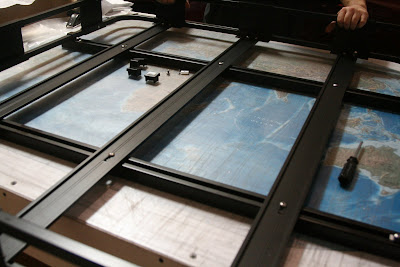
The grid of crossbeams, floor slats, and sides.
![Image]()
Legs are added to the crossbeams.
![Image]()
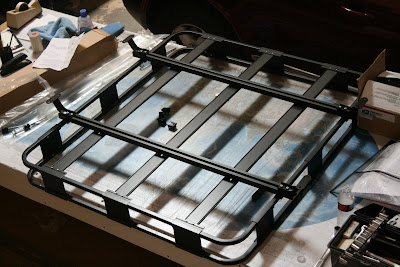
The structure as designed completed.
We lifted the completed structure onto the Touareg to examine the fit. Of issues, we needed to move the Surco Safari rack far enough forward to allow clearance for an open back hatch. This presented a very minor overlap of the sunroof.
The sharkfin antenna 'duck' had to be removed since the center floor slat blocked it. We could have moved the whole assemble further forward, however it would begin to block the sunroof access. The duck can be repositioned to the Surco rack once a suitable interconnect cable is found.
Also in this particular installation, several pre-existing Ham antenna mounts had been assembled into roof channel that included copper grounding to the nearest mounting hole. The Surco legs could not fit in those spots, so a decision was made to shift a crossbeam further back past a stanchion. New holes were drilled into the floor slats to accomplish the move.
After the test fit and changes to the crossbeam locations, we reinstalled the Ham antenna mounts and installed the Spare Tire carrier. The spare tire carrier attaches directly to the floor slats and crossbeam.
The entire assembly was relifted onto the Touareg. Then began a painful task of aligning the basket on the crossbeams and then locking the legs to the vehicle. While the mounting system works, working short bolts into metal squares in the channel proved challenging. We ended up making shims to lift the threaded metal squares closer to the bolts during assembly. Several measurements were taken and we finally got with 1/8". Further review of the alignment will be undertaken after a week of use.
Then came the Spare Tire Carrier issue....
![Image]()
Add any caption you like to this absurd situation here")
During the final step we discovered that Surco had painted the Spare Tire Carrier threaded rod. Working the tire security bolt onto the rod - the paint gummed up the entire process and eventually got stuck. A forklift was employed to get a better angle on the Spare Tire mount since working on the step ladders was not a happy situation. Once the system was unstuck, Vegas Matt was able to strip the paint, clean the bolts with a wire brush, and add a bit of WD40.
![Image]()
Success. Thanks Vegas Matt!!!
The listed configuration for a Surco Safari rack is 45" x 60" long. This should fit; however it would shadow the entire sunroof when installed. Since I wanted the sunroof for light, and the capability for a copilot to crawl through for 'hatch' viewing, I decided the 45" x 50" version was appropriate.
There are other options - Yakima and Thule make excellent roof baskets. However to go this route often means investing in their rack system or an adapter before the basket is acquired. And in most cases their roof basket s are about 40" wide. I desired more room to clear several Ham antennas mounted on the roof channel; as well opportunity to store 48" sections of mast, shovels, and other items along side the mounted tire.
The Surco Safari Rack can be acquired for around $260 with proper legs; with the Spare Tire Carrier an additional $80 using online shops.
The Surco Safari Rack arrived. Las Vegas neighbor and frequent Touareg offroader Vegas Matt generously offered to help, so we met at his garage / facility to install the system.
Construction starts with 4 "L"-shaped basket sides.
Connect each side to form the loop. Sheet metal screws
are used to secure the sides together.
Three slats are added to form the 'floor' of the basket.
Two crossbeams are added. Threaded metal squares are slid into the channels to secure the side and each floor slat to the crossbeam.
A bracket is added to secure the crossbeam to the side. Note how the screw is bolted into the threaded metal square.
The grid of crossbeams, floor slats, and sides.

Legs are added to the crossbeams.
The structure as designed completed.
We lifted the completed structure onto the Touareg to examine the fit. Of issues, we needed to move the Surco Safari rack far enough forward to allow clearance for an open back hatch. This presented a very minor overlap of the sunroof.
The sharkfin antenna 'duck' had to be removed since the center floor slat blocked it. We could have moved the whole assemble further forward, however it would begin to block the sunroof access. The duck can be repositioned to the Surco rack once a suitable interconnect cable is found.
Also in this particular installation, several pre-existing Ham antenna mounts had been assembled into roof channel that included copper grounding to the nearest mounting hole. The Surco legs could not fit in those spots, so a decision was made to shift a crossbeam further back past a stanchion. New holes were drilled into the floor slats to accomplish the move.
After the test fit and changes to the crossbeam locations, we reinstalled the Ham antenna mounts and installed the Spare Tire carrier. The spare tire carrier attaches directly to the floor slats and crossbeam.
The entire assembly was relifted onto the Touareg. Then began a painful task of aligning the basket on the crossbeams and then locking the legs to the vehicle. While the mounting system works, working short bolts into metal squares in the channel proved challenging. We ended up making shims to lift the threaded metal squares closer to the bolts during assembly. Several measurements were taken and we finally got with 1/8". Further review of the alignment will be undertaken after a week of use.
Then came the Spare Tire Carrier issue....

Add any caption you like to this absurd situation here
During the final step we discovered that Surco had painted the Spare Tire Carrier threaded rod. Working the tire security bolt onto the rod - the paint gummed up the entire process and eventually got stuck. A forklift was employed to get a better angle on the Spare Tire mount since working on the step ladders was not a happy situation. Once the system was unstuck, Vegas Matt was able to strip the paint, clean the bolts with a wire brush, and add a bit of WD40.

Success. Thanks Vegas Matt!!!